Ubhuntu下安装配置Apache2Perlcgi-bin
首先安装sudo apt-get install libperl-dev
去http://httpd.apache.org/download.cgi#apache22下载httpd
安装方法:./configure make make install
这样你的apache2就安装到了/usr/local/apache2下.
cd /usr/local/apache2/bi
udo ./apachectl start
在地址栏输入127.0.0.1,发现“It works!",页面的内家取决于htdocs/index.html的内容。
任何地方都可以调用apachectl
udo vim /root/.bashrc
export PATH="$PATH:/usr/local/apache2/bin"
vim ~/.bashrc
export PATH="$PATH:/usr/local/apache2/bin"
设置开机自动启动Apache
在/etc/init.d下建立一个shell文件apache
#!/bin/bash
/usr/local/apache2/bin/apachectl start
$chmod +x apache
在/etc/rc5.d下建立一个指向apache的软链接
$ln -s /etc/init.d/apache S20apache
因为rc(0--6,S).d下的文件是在系统启动后自动执行的嘛,另外rc(0--6,S).d下文件名的命名规则:以S开头是启动,以K开关不是启动。注意rc.d下建立的软件链接指向的文件必须是/etc/init.d下的文件。
最后执行update-rc.d apache default
详细内容参加rc5.d下面的README文件。
实际上开机自动启动还有另外一种简单的方式:System==>Preference==>Startup Applicatio
在/usr/local/apache2/cgi-bin下已经给了个测试程序test-cgi,我们在地址栏是输入127.0.0.1/cgi-bin/test-cgi发现“Internal Server Error",出现这个问题有三种原因:
找不到脚本解释器。shell的话第一行就用#!/bin/sh,Perl的话第一行就用#!/usr/bin/perl 脚本语法有误 权限问题。从浏览器中访问apache服务器文件的用户默认组别是"Nobody",执行sudo chmod 755 test-cgi就解决问题了。
udo chmod 777 /usr/local/apache2/cgi-bi
在cgi-bin下新建一个文件hello.pl
#!/usr/bin/perl
rint "Content-type: text/html"
rint "Hello, World."
$chmod 755 hello.pl
在浏览器地址栏输入http://localhost/cgi-bin/hello.pl测验一下。
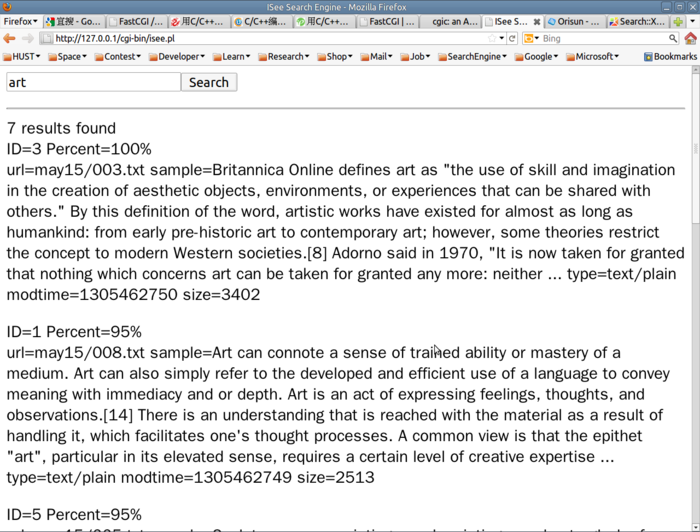
下面给一个正式的CGI代码,也是我做的第一个搜索引擎的demo,具有划时代的意义!
#!/usr/bin/perl
use CGI qw(:standard);
use Search::Xapian;
print header;
print start_html(-title=>'ISee Search Engine',-align=>'center');
print start_form,
textfield('terms'),
submit('Search'),
p,
end_form;
print hr;
if(param()){
my $db = Search::Xapian::Database->new("/home/orisun/master/db2");
my $term=param('terms');
my $enq = $db->enquire($term);
##printf "Running query '%s'\n", $enq->get_query()->get_description();
my @matches = $enq->matches(0, 10);
print scalar(@matches) . " results found";
print br;
foreach my $match ( @matches ) {
    my $doc = $match->get_document();
    printf "ID=%d Percent=%d%%<br>%s", $match->get_docid(), $match->get_percent(), $doc->get_data();
    print p;
}
}
print end_html;
运行效果:

彻底删除Apache 首先停止服务: service httpd stop apchectl stop 再删除 1、sudo apt-get --purge remove apache2
2、sudo apt-get --purge remove apache2.2-commo
3、sudo apt-get autoremove (此命令会自动卸载PHP) 最后手动删除Apache的所有文件